How to view the Position Size Calculator for thinkorswim

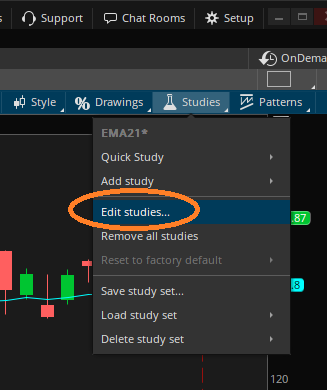
Once you’ve installed the Position Size Calculator for thinkorswim you may be asking yourself how to actually view the calculations. Some thinkScripts overlay things on your charts, but this particular script adds calculations to the data box. In this post, I’ll describe how you can enable to floating data box so you may easily view the position size calculations. Before you proceed, be sure that the indicator is installed in one of the “lower” positons of the edit studies area. Placing it on the “Price” or “Volume” area will smush the candles on the chart.

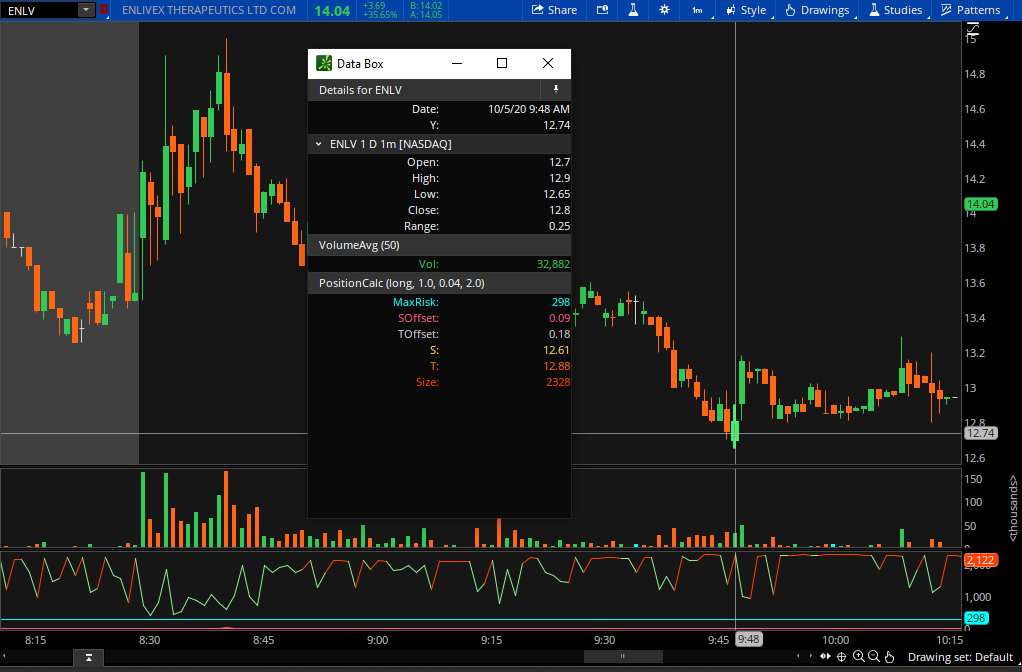
Data Box is a tool that displays values from the status string on chart. Once enabled, Data Box displays OHLC and study values for the bar under the cursor. As you move the cursor across the chart, values change in the same manner as in the status string.

In order to enable Data Box, choose Settings from the Style menu and activate Data Box item on the General tab. Choose Floating to make the Data Box follow the cursor or Fixed to display it as a separate element. Choose Off so that the Data Box will not be shown. You can also turn off the status string since the values are displayed in Data Box.

If you chose to use the Fixed mode, Data Box will appear as a separate element: you can move it to whichever position you prefer. This mode will also restore this position if you restart the application. There is also an option to display it above all opened windows so that it will be visible even if you minimize the application window; in order to do so, click the Pin button at the top of the Data box. Note that if you use a grid of charts, Fixed mode will show values for the chart under cursor.

In the Floating mode, Data Box will follow the cursor, so, the list of displayed values is not customizable. Consider using the Synchronize crosshairs position option on General tab of Chart settings in order to display separate Data Boxes for each chart in a grid. Note that in the Floating mode, Data Box will be hidden if the size of chart window is not sufficient to display it.

TD Ameritrade Learning Center

I have to say, I’m a big fan of the floating mode. It allows me to place the data box on another screen so it doesn’t interfere with my charts and other account information that I like to leave up. Also, when it’s in fixed mode, there’s very little data you can actually see if you’re screen isn’t super wide, so for me it’s practically useless in that mode.

Find other tips, tricks, and content on these other fine social media platforms. Please subscribe/follow to stay informed of the latest content!

How to create a TD Ameritrade API key for automated trading

If you’re planning on developing an app to automate your favorite trading strategies, or you’ve gotten your hands on a copy of Trade For Me and you’re just getting started, you will need to create a TD Ameritrade Developer account and register an application to get an API key (consumer key). In this article you will learn step-by-step how to complete your account set up.

Step One: Register

TD Ameritrade Developer register

In your browser, navigate to developer.tdameritrade.com and click the “Register” link at the top of the page. When prompted to choose a username, ignore the rules provided (special characters, spaces, etc.). They are inconsistent. The best choice for your username will be letters only with no spaces or special characters.

Step Two: Activate your account

TD Ameritrade Developer email

After completing the registration form, you will receive an email with a link to activate your account.

Step Three: Create a profile

TD Ameritrade Developer profile page

Fill in your profile details. In this step you will create a password, add your first and last name, add your address, choose a timezone, and accept the terms and conditions.

Step Four: Add an app

TD Ameritrade Developer add app screen

Click “Add a new App”

TD Ameritrade Developer App Details Screen
  • Give your app a name
  • Enter a callback URL. The callback URL will be the URL to which you are redirected after successful authentication. If you are using Trade For Me, this is the app URL on your local network, and after authentication, you’ll be redirected to the app and the access and refresh tokens will be saved in your local database.
  • Describe the purpose of your app
  • Enter an order limit

Step Five: Copy your API Key

TD Ameritrade Developer API Key

After creating the app, you will be able to open it and retrieve your API Key (Consumer Key).

Congratulations! You have completed your app configuration in the TD Ameritrade Developer website. Now it’s on to the next step. Making money!

Find other tips, tricks, and content on these other fine social media platforms. Please subscribe/follow to stay informed of the latest content!

How to install thinkorswim (TOS) studies

thinkorswim study installation steps

Installing the studies into your thinkorswim platform takes only a few moments. After purchase, you will be provided a download link. The downloaded file will be in a .zip archive format and you will need to extract the contents of the .zip file before installation. On a mac, simply double-click the zip archive to extract it into a folder with the same name as the .zip. On a Windows computer, right-click and choose “Extract All” from the context menu. You will be provided with an option where you would like to save the extracted files.

1. Select studies menu, then edit studies

thinkorswim edit studies

2. Choose the import option

thinkorswim import

3. Navigate to and choose the name_of_script_here_STUDY.ts file from the .zip archive

thinkorswim (tos) navigate

4. Rejoice! You’ve successfully installed the thinkorswim (tos) study into your platform!

Find other tips, tricks, and content on these other fine social media platforms. Please subscribe/follow to stay informed of the latest content!